How to Add a Signature In Outlook
Your email signature serves as a virtual business card for you. It's not just a way to sign out but an opportunity to provide recipients with your contact information, a glimpse of your professional branding, or even legal disclaimers. As one of the most widely used email clients, Microsoft Outlook offers flexible options for creating and customizing email signatures.

7IF blog will provide a complete guide on how to create an e-signature easily, insert a signature in Outlook, and some helpful tips on how to make your e-mail signature look more professional.
Table of contents
- Benefits of Including a Signature in Professional Emails
- Creating a Signature in Outlook Step-by-Step
- Designing Your Signature
- How to Add a Handwritten Signature to Outlook?
- Creating a Signature Image File: 7ID App
- Adding Hyperlinks and Social Media Icons
- Including a Disclaimer or Legal Text
- Previewing and Testing Your Signature
- Saving and Applying Your Signature
Benefits of Including a Signature in Professional Emails
Including a signature in your emails isn't just about etiquette — it's about branding and setting the tone for your professional personality. A well-crafted email signature serves as your digital business card. It provides recipients with your contact information, job title, and links to your website or social media profiles, promoting better connectivity and accessibility.
It also lends credibility and a sense of professionalism to your messages, ensuring that you make a lasting impression on colleagues and clients alike.
Creating a Signature in Outlook Step-by-Step
How do I create my signature in Outlook? Microsoft Outlook makes it easy to customize your e-mail with a personal signature. Here's how to set it up:
- Open a new e-mail message.
- On the Message tab, click Signature, and then click Signatures.
- In the E-mail account list, select the e-mail account that you want to use.
- Under Select Signature to edit, choose New, and type a name for the signature.
- In the Edit signature box, type the signature you want.
How to change the signature in Outlook? To update or change your e-mail signature in Outlook, simply navigate to Outlook, click File > Options > Mail, and then click Signatures under the Compose Messages section. On the Email Signature tab, select the signature you want to edit from the list on the right. Make changes in the editing window, then click Save to update your signature.
Designing Your Signature
When designing your signature, start with the basics: your personal information. This includes your name, title, and the company you represent. These elements align your identity with your professional brand and make it easy for recipients to identify who you are and what you do.
Next, include your contact information. A phone number and email address are essential; they provide a direct line for colleagues and clients to reach you. It's all about making communication as easy as possible so that anyone who needs to contact you can do so without having to dig through old emails or online directories.
For those who want to personalize their signature further, adding a professional photo can be a powerful tool. A clean, smiling portrait adds a personal touch and helps people recognize you in real-world settings, such as conferences or business meetings. Remember, a picture is worth a thousand words, so make sure yours says “professional”.
The aesthetics of your signature, namely the font and formatting, also play an important role. Choose a font that is easy to read and professional; classic choices like Arial, Calibri, or Times New Roman work well. Use bold or italics to emphasize important information, but avoid clutter. Colors can draw attention or match your company's branding, although it's generally best to keep the palette simple and consistent.
How to Add a Handwritten Signature to Outlook?
How do I add a signature in Outlook? Adding a handwritten signature can further personalize your e-mail messages and make them stand out. Here's how to add a handwritten signature to your Outlook e-mail:
- Take a piece of white paper and sign your name on it.
- Take a picture or scan your signature into your computer.
- Keep the image file handy.
- Go to Outlook and find “Settings.”
- Find Signature Options and click “Email Signature.”
- Click where you want your signature image to go, and then click the image icon on the toolbar.
- Select your signature image file, upload it, and be sure to save your changes.
Creating a Signature Image File: 7ID App
Create Outlook signature online with the dedicated 7ID app. Here's a quick guide on how to do it:
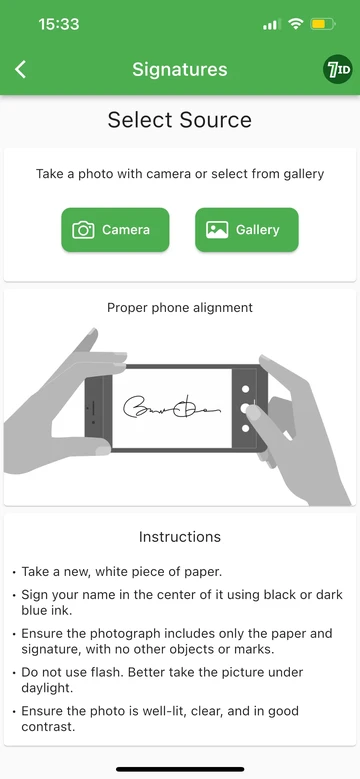
- Simply sign your name on a plain white piece of paper.
- Download the 7ID App to your smartphone from the App Store or Google Play.
- Go to the Signatures section and press the New Signature button.
- Use your phone's camera to take a clear picture of your handwritten signature.
- Tell the app what kind of document you'll use your digital signature on.
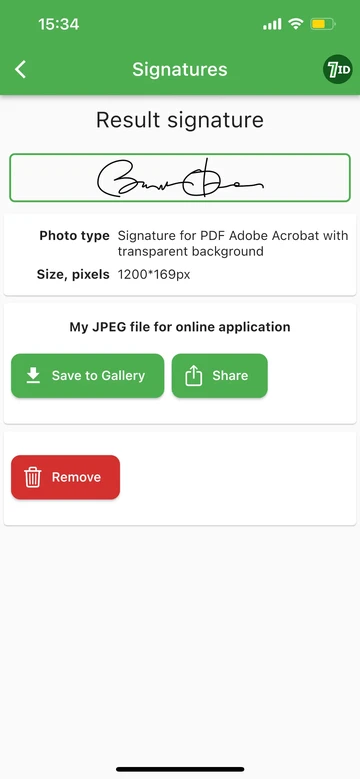
- Download your Outlook signature template from the app.
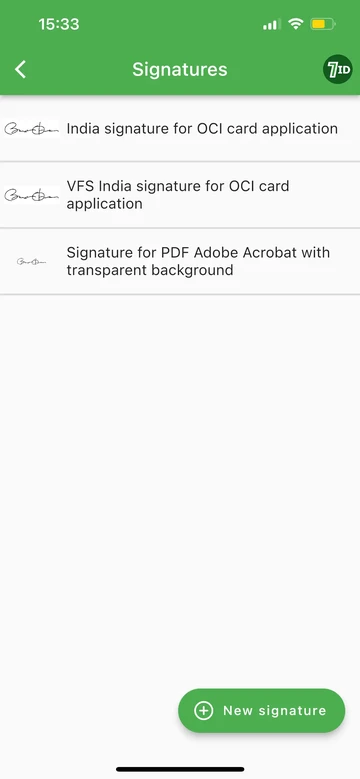
The 7ID app has a special feature for its subscribers that allows you to create a digital signature that is perfect for PDFs. This signature comes with a transparent background and is saved as a JPEG, making it versatile for use in different programs such as Adobe Acrobat. This premium feature comes with a 7ID subscription, giving you unlimited storage for various codes and passwords.
If you're applying for VFS (Visa Facilitation Services) to get an India OCI (Overseas Citizen of India) card, or for certain other documents, 7ID offers a free digital signature service. This feature converts your handwritten signature into a perfectly formatted JPEG file for these specific applications, free of charge.
Adding Hyperlinks and Social Media Icons
Adding hyperlinks to your website, portfolio, or company website invites recipients to learn more about you or your company. To do this, simply highlight the text you want to make clickable, click the “Insert Hyperlink” button (which often looks like a chain link), and then type in the URL.
Adding social media icons to your signature can also help you reach people across multiple platforms. To add these, you'll need to have the social media icons saved as images. Then, just as you would insert a photo, you can insert these icons into your signature. Once in place, you can select each icon individually and turn them into clickable hyperlinks to your respective social media profiles.
This method not only enhances the visual appeal of your signature but also encourages deeper professional connections.
Including a Disclaimer or Legal Text
In some industries, including a disclaimer or legal text in email communications is necessary. This may be for confidentiality, environmental reasons (such as encouraging people not to print emails), or various legal requirements.
Start by opening a new email, then click the Signature button under the Message tab and select Signatures. Click New to create a new signature and name it. Type or paste any legal text or disclaimer you want to include in the text area. Make sure it's clear and concise, and that it follows any specific rules or guidelines. Remember to click Save.
When it comes to adding disclaimers or legal notices to your email signature, here are a few tips to keep it simple and effective:
- Ensure your disclaimer is short to not overwhelm the person reading it.
- Make sure your disclaimer is accurate and meets all legal requirements.
- Use a smaller or different font so it's distinguishable from the main content of your signature.
Previewing and Testing Your Signature
Once you've assembled your signature with all the necessary components, it's important to preview and test it to make sure that everything appears as you intended.
In Outlook, after you've created or edited your signature, compose a new email to see how your signature looks in action. Pay attention to the layout, formatting, and any hyperlinks or social media icons to make sure they work correctly.
It's a good practice to send a test email to yourself or a colleague. This can help you identify any issues that might take time to be apparent in the Signature Editor, such as how your signature displays on different devices and email clients.
Saving and Applying Your Signature
After carefully designing your signature and previewing and testing it to ensure everything is perfect, it's time to save and add a signature line in Outlook. To do this, click OK or Save in the signature settings after you have completed your signature to save your changes.
You will then have the option to set this signature as the default for new messages, replies, and forwards in one or all of your Outlook-connected e-mail accounts.
How to make an automatic signature in Outlook? To add it automatically, set it in the “New Messages” and/or “Replies/Forwards” drop-down menus, depending on your preference.
If you have multiple signatures for different purposes, you can manually select which signature to use each time you compose a message.
Whether you need to sign emails or important documents, the 7ID app lets you create a professional-quality digital signature on your phone.
Read more:

Uzbekistan Visa Photo App: Visa Guide To Follow
Read the article
PDF Signature App
Read the article
Proper Ways to Address And Sign Your Formal Correspondence
Read the articleDownload 7ID for free